Guide to the Cursive Alphabet Practice Sheet
What Is on the Sheet
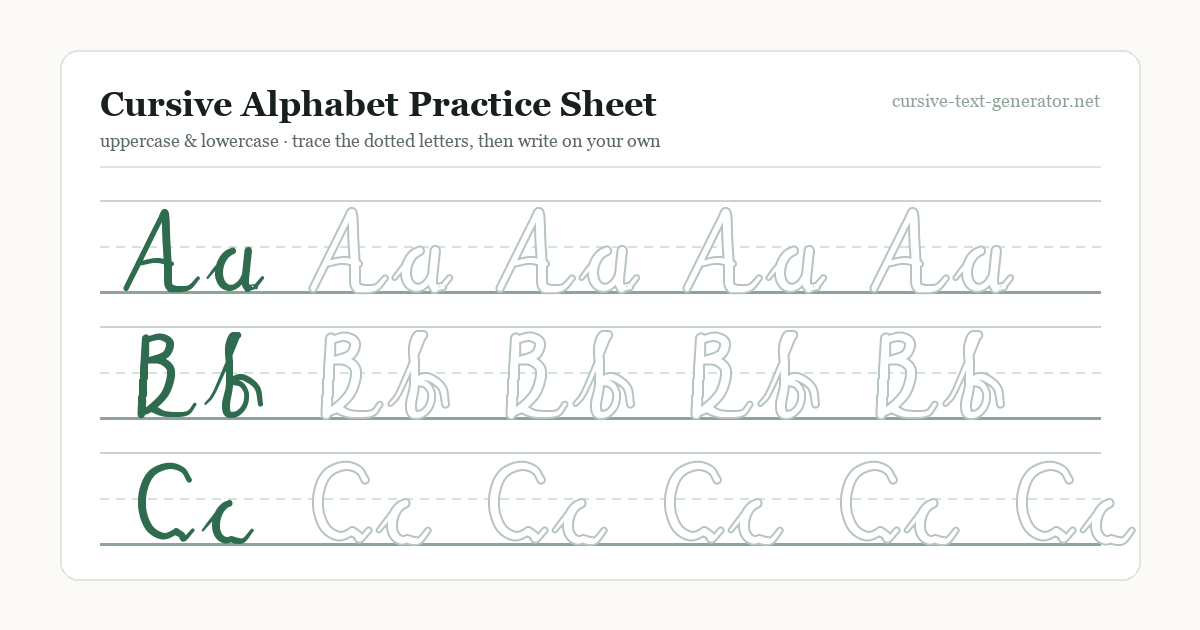
Every cursive alphabet practice sheet generated on this page follows the same layout, because it is the layout that teachers have settled on for letter formation: three-line ruled paper with a solid top line, a dashed midline for x-height, and a solid baseline. Each letter gets a full row. The row opens with a solid green model of the letter, followed by three dotted outline copies to trace, and then the rest of the line is left blank so the student writes the letter without any support. That progression — look, trace, write — is on every row, so a student never has to trace a whole page before attempting the letter alone.
In the default Uppercase + lowercase setting each row shows the capital and the small letter together as a pair (Aa, Bb, Cc), the way most classroom alphabet strips are laid out. Switch to Lowercase only for the sheet most beginners should actually start with, or Uppercase only for the capitals once the lowercase alphabet is secure.
Practice Sheet vs Alphabet Chart
The Practice sheet layout is the worksheet: 26 ruled rows across three A4 pages at one row per letter, or six pages at two rows per letter. The One-page alphabet chart layout puts all 26 letter pairs on a single page with no tracing rows. It is the reference copy — laminate it, tape it to the desk or pin it above the board so the student has a correct model in view while working through the practice pages. Printing both is the usual classroom set: one chart per desk, practice sheets as needed.
Lowercase First, Then Capitals
If you are working through the alphabet for the first time, print the lowercase sheet before the uppercase one. Roughly 95% of the letters in any running text are lowercase, the 26 lowercase cursive letters share a small set of entry and exit strokes, and they are the letters that actually join — so they are where fluency comes from. Capital cursive letters are larger, more decorative, less consistent from one style to another, and most of them do not join to the letter after them. Every mainstream handwriting program (Zaner-Bloser, D’Nealian, Handwriting Without Tears, and the UK continuous-cursive schemes) teaches the lowercase alphabet first for that reason, and introduces capitals afterwards, often only as the first letter of a name. The English national curriculum programmes of study set the same order: lowercase formation in Year 1, joins from Year 2, and consistently joined handwriting from Year 3.
Why the Alphabet Is Not Taught in Alphabetical Order
An A-to-Z practice sheet is the right format for review and for a wall chart, but for first teaching the letters are usually grouped by how they begin. The four families on this page follow the split used in most US and UK programs:
- Undercurve letters — i, t, u, w, r, s, j, p. A short curve up from the baseline. These are taught first because the stroke is the easiest, and because i, t and u already give a child enough to write joined words like it and tut.
- Overcurve letters — n, m, v, x, y, z. A hump curving over the top. n and m are the same movement once and twice, which makes the pair a good place to teach rhythm.
- Loop letters — l, h, k, b, f, e. An upward loop through the ascender space (e is the short loop that stays below the midline). Loops that do not close at the top, or that are too fat, are the most common fault here.
- Oval letters — a, c, d, g, o, q. An anticlockwise oval that starts around the 2 o’clock point. Getting the oval to close is what keeps an a from reading as a u or an o.
Use the Letters menu to print one family at a time, or type your own set into Custom letters — for instance the four or five letters a student keeps getting wrong.
Which Settings to Use for Which Student
- First pass through the alphabet (Grade 2–3 / UK Year 3, ages 7–9): Lowercase only, one family at a time, 3 rows per letter, Trace 3, then write. One family is one short session.
- Consolidation (Grade 3–4 / Year 4): Full alphabet, both cases, 1 row per letter. Three pages, one per day, then repeat weekly as a warm-up.
- Handwriting intervention or SEN support: Custom letters (the ones being confused), Trace every letter, 2 rows. The dashed path on every repetition keeps the pen on the correct route until the movement is automatic.
- Older students and adults relearning cursive: Full alphabet, Model letter only, 1 row. No tracing — just a correct model at the start of each line to copy.
Printing Tips
- The sheet is sized for A4 portrait and fits US Letter with the printer’s default scaling. Only the worksheet pages print; the site header, controls and this text are left out.
- Choose Save as PDF in the print dialog to keep a copy for later or to share with a class.
- The PNG download is rendered at 2× resolution (1588 × 2246 px), sharp enough for a full-page print or a Google Classroom assignment. SVG gives a vector file you can resize without loss.
- Laminate the alphabet chart and the one-row review sheet and reuse them with a dry-erase pen.
Cursive Alphabet Sheets vs Word and Name Sheets
This page drills the letters themselves. For blank ruled paper, sight-word and sentence sheets that need no set-up, see the printable cursive handwriting practice sheets. Once a student can form the letters, move to words: the cursive practice sheets generator turns any word, spelling list or sentence into a copy sheet, and the cursive name tracing generator and name practice generator do the same for a child’s own name — usually the first cursive word anyone wants to write. For the shape of each letter and the letters it is confused with, see the cursive letters A–Z index.
Cursive Alphabet Practice Sheet FAQ
What is a cursive alphabet practice sheet?
A printable worksheet that gives every letter of the alphabet its own ruled line, with a model of the cursive letter, dashed copies to trace, and blank space to write it unaided. Uppercase and lowercase are shown together (Aa, Bb, Cc) or on separate sheets.
Is it free to print?
Yes — no account, no watermark, no download limit. Print from the page, save as PDF, or download each page as PNG or SVG.
Should students practise lowercase or uppercase cursive first?
Lowercase first. Lowercase letters make up about 95% of written text, share a small set of joining strokes, and are the letters that actually join. Capitals come after the lowercase alphabet is secure.
What order should cursive letters be taught in?
By stroke family rather than A to Z: undercurve (i t u w r s j p), overcurve (n m v x y z), loop (l h k b f e), then oval (a c d g o q). The Letters menu prints each family as its own sheet.
What grade is this for?
Cursive is usually introduced in Grade 2 or 3 in the US (Year 3 in the UK), but the sheets suit any beginner, including adults. Use 2–3 rows per letter for first-time learners and 1 row for review.
How do I save the sheet as a PDF?
Click Print / Save as PDF and choose “Save as PDF” as the printer. Each worksheet page becomes one PDF page.